What You Need To Know About Web Based Design Tools: Roomstyler & Homestyler
As designers, there's a good chance we want the latest & greatest in design tools -- we want our resources to be as creative as we are.
As entrepreneurs, however, we want to smart about choosing what tools to invest in -- we want to spend wisely!
Finding the sweet spot between these two mindsets is the makings of a savvy business owner, and thankfully for most of what we need done in the digital space, there are a number of free (or low cost) web-based programs we can use, so we're not spending haphazardly or laboring over installing & learning new software.
No matter if you're an in-person designer or an online designer, deliverables are a huge part of our client experience, and for many of us, rendered designs are often part of those deliverables.
Our clients tend to be as visual as we are, needing to see the full potential of their space or how the results of the design before committing to anything, and so providing them with something more robust than a 2-D mood board can be the difference between a happy client & a raving fan!
For creating renderings there is no shortage of amazing resources -- SketchUp, Revit, and Chief Architect to name a few. But before you run for the hills, there are also two web-based platforms that are super affordable (how does free sound?) and all things considered, easy to use:
Roomstyler & Homestyler!
Both Roomstyler & Homestyler are free, web-based rendering programs for creating & generating rendered space plans & designs. Unlike many more robust software programs, there is nothing to download; instead, you create a free account with either one of these programs & then you're on your way!
User Interface
Both platforms from the start you'll notice have a very similar interface -- grid area for design, side bar for furnishings & building elements, top bar for general settings & tools, and a rendering preview pane.
Both programs also feature a "drag & drop" system, making them comparably user-friendly, no matter your tech savviness. Also, for this reason,, no training is required although both do provide a pretty decent amount of helpful resources.
Product Assortment
While on both Roomstyler & Homestyler you'll find real life items that you can shop, Homestyler offers a more robust variety of choices and brands to use in projects, with customizable options as it relates to the sizing.

Homestyler Catalog By Room With Subcategories

Roomstyler Catalog By Varying Drop Down Categories & Subcategories
Brands you can find on Homestyler include American Leather, FLOR, Herman Miller, IKEA, and West Elm...just to name a few.
Roomstyler, on the other hand, while a very large catalog, has few brands & what you get is what you see -- no options to alter the size. The upside, however, is that the catalog, for items like rugs, will offer an array in sizes.
So while you can't go wrong with either one when it comes to sourcing for your renderings, each will yield different results depending on your needs.
Space Planning
A crucial part of the design process & natural byproduct of rendering is the space planning.
While precise measurements for scaled floor planning isn't available (measurements cannot be fractions) you are able to create close to precise space plans. And with this, you are able to use the space plan created within the program, should it align with your scope of work.
In Homestyler this is a native feature, where you're able to remove furniture & download the space plan. You're even able to export the file as a dwg, AutoCAD compatible file.
Roomstyler does not have this native capability, so an alternative would be to simply grab a screenshot of the plan from the design space.


Background Scenery

Native Homestyler Scenes
To create a realistic representation of the design for your client, you may want to incorporate realistic environment settings. Fortunately with both programs, this is possible, eliminating the need for any additional afterwork in a separate program.
Homestyler comes pre-loaded with 3 environments, while Roomstyler allows you to import your own scenes.
The latter is especially convenient for a more custom feel, allowing you to import anything from downtown Montreal, CA to the slopes of The Aspens. With this option, however, you'll want to be mindful of the perspective of the image you choose. This concern is mitigated with the pre-loaded options of Homestyler, since they're native to the program.
The alternative? A blank background that'll be visible when rendering an angle facing a window or open door.


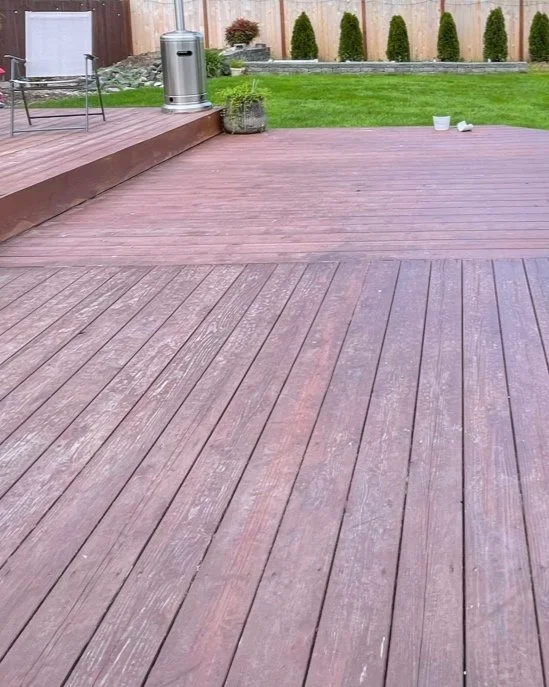
Rendered Results
As to be expected, both programs will yield photorealistic design renderings, however, the way in which they do this vary as will the results.

Roomstyler Camera Properties
Roomstyler has 3 camera views -- zoom for tight shots, normal for your "standard" view, and wide for more inclusive, wide angle shots -- in addition to the ability to adjust the height of the camera from ground level all the up to overhead. This flexibility with the Roomstyler camera gives you the ability to basically have a digital photoshoot with the design you create. In addition to the variety of camera angles, prior to rendering your design you have the option to play around with the lighting -- artificial & natural.
The ability to control the light settings for your design is a key feature in producing a photorealistic rendering -- the lighting in a rendering adds depth and is what takes it from being a flat design to a realistic illustration of the space.
Homestyler's camera while not explicitly available with different angles & heights, can be manipulated for rendering, allowing to also capture a precise view. So while a different interface for the controls, the end result can be comparable to Roomstyler's cameras.
While in the design, the Homestyler camera has two key camera features that allow for a more robust user experience:
you can save multiple camera locations, allowing you to return to the same position multiple times, with precision
the camera settings can be manipulated for height & angle, similar to Roomstyler, as your primary camera view
Yielding very similar results, these two features in Homestyler combined, however, are very reminiscent to the capabilities of rendering software, versus a web=based experience.


The lighting, however, is a major point of differentiation between the two programs.
In Roomstyler the controls include controlling artificial lighting & natural lighting, as separate controls. In Homestyler this takes a different form, with the controls only being available for natural lighting.

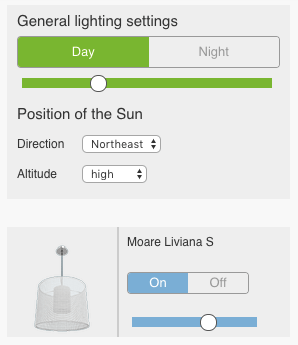

Where Homestyler does not allow for controls of artificial lights, when rendering it does allow for different output "temperatures" for a rendering that's on the cooler side or on the warmer side, with a total of 5 different "degrees" in tone. This can be a great way to establish a "theme" or style for the types of renderings you provide.
Downloadable File
The prettiest design means nothing if you can't share it. Am I right?

Downloaded Homestyler Rendering With Watermark
With both programs you are able to download a jpg image file of your design, at different camera angles -- aka a digital photo shoot -- allowing you to then use the images on your website, social media, email list, and/or other media, not to mention allowing you to share the images with your clients. The image that is downloaded will be the renderings you produce using the aforementioned camera & lighting tools. Homestyler, however, places a watermark on the lower right corner of every rendered image once downloaded; so when creating the rendering be mindful of what's in the corner & how it'll be effected by the watermark.
TIP: If you do not want to present with the watermark, create the rendering view with a bit of excess on the right so that you can easily crop out that area.
Once the downloaded file is downloaded to your computer, voila! You now have a portfolio of renderings that'll be your digital representation of your work.
A few different ways you can use your renderings include:
website portfolio
social media content
design blog post
video presentation
For each of these programs there are going to be areas in which one excels a it more over the other but what to keep in mind is that there isn't a "one size fits all" model to choosing. You may find that one perfectly aligns with your needs or that you use both, depending on the project. It may even be the case that you decide neither suits your deliverables -- and that's okay too!